Sunday, August 31, 2008

Ponds in the vegetable patch

Well it was clean up time for my garden this week and part of it was to pull my pond apart and re-lay the facade  covering the pond. I thought it a perfect opportunity to show you all how easily and inexpensively it can be made.


Here you see the pond as it was,


This following photo is what the pond really looks like. It is just a depression made in the earth then lined with black builders polythene. For me I chose the platform style made up from old fence palings and laid out to form the look below. You can choose to landscape yours with soil, stone plants , pother's or whatever you like - the possibilities are endless. Please note that I have not used any nails or fasteners for easy dismantling of maintenance


The advantage to the pond is that it attracts other animals plus what I like is adding another element to the garden - the missing one -Water. Bit too out there for some but I think the idea of the four elements air fire water earth is part of the balance in gardens. Introducing things like frogs, insects, fish and water plants creates a new eco-culture in it's own environment and this in turn has an effect on the culture of the garden you are creating. Diversity is the key to balance and this in turn determines the levels of health.

Anyway hope this may interest someone out there

Saturday, August 30, 2008

Making a worm place

Worms are good for your garden because they eat decaying material and they help break up soil and are good for fertility. Here is an easy way to make a worm farm.

You can make it out of old tyres or crates. Here's what you do.

Get a piece of old perspex or corrugated iron and lay where you want it. Raise one end with something. I used an old phone book.and bits of old paving stones.

Next you soak some newspaper and cardboard in some water. Enough to stuff around the inside part of the tyre. This is where the worms will lay eggs and it serves also as food for fungi and bacteria that break down food for the worms.

Then you get some lawn clippings,, more wet shredded paper, compost and soil. Just enough to make like a 3cm layer on the bottom. Then you get some food scraps and put on top. This is food for the worms. The next part is the hard part. Finding worms. You can buy them, but I just went on a worm hunt around the garden. Next place another tyre on top and when the compost is ready you remove the lower tyre and the put it back on top again. Feed the worms with veges and food scraps and wet shredded paper. Add water if paper dries out and once a month dust with garden lime. Lastly cover the tyres with plastic weighed down with something to keep it in place. I used a couple of bits of wood and a pot plant

I didn't find too many worms so I'll look again tomorrow.

Friday, August 29, 2008

Ladybug/ladybird babies and teenagers

Recently I was geeking out over the ladybug nymphs and pupae on my sunflower. Some of the neighbors came over to see what I was so excited about. Not all of my neighbors knew what ladybug nymphs and pupae look like and I thought it was important to show them lest they accidentally mistake them for pests and kill them!

On the left is a ladybug nymph. Some people think they're ugly little alligator-looking thingies but I think they're kinda cute! They're also very important in the garden, I can't remember the exact numbers but ladybug nymphs eat far more aphids than the adults!

On the upper right hand side of the top photo are two ladybug pupae. Obviously, they can't eat while they're pupating but it's still important not to harm them because soon they will emerge as adults and eat more aphids for us! And if we're very lucky they'll stick around to lay more eggs. This is actually the second generation of ladybugs on my sunflowers. Ain't nature grand? It's so grand that I didn't even plant this sunflower that I'm enjoying so much! I suspect that the birdies planted it for me, wasn't that nice of them?

Below is another photo of a different nymph, so you can see a little bit better what they look like.


As a general rule, when you see a pest in your garden you should wait two weeks before spraying anything, because even "organic" sprays can kill beneficial insects such as these ladybugs. If after two weeks you don't see any beneficials then spray if you must but with the least toxic spray possible. For many insects a good hard spray of water is enough.

I would also add that if you see an insect in your garden and you don't know what it is then don't automatically assume it's naughty and start spraying. It's very possible that your unidentified insect is nice, or even simply neutral. If it is naughty then it will attract nice insects, and while you're waiting your two weeks insects you can do research to find out what your insect is.

Tuesday, August 26, 2008

Back to the Future

Growing food


When I was a kid every back yard in our street had a vegetable patch and the traditions of growing vegetables were passed on simply by the fact that the whole family were involved in the chore of tending to the garden. The affluence following the 50’s and 60’s in many, many ways saw the traditions of growing your own and backyard varieties of  fruit and vegetables simply fade away due to the era of convenience and commerce and even more disturbing was  the dependence on fertilizers, pesticides and such which changed the methods of back yard gardeners.

This is my grandfather in the 1920's

- must be in the blood.     

Back in the late 70’s I felt a need to learn to grow food using techniques not involving manufactured fertilizers or pesticides as I saw that in the future there would be perhaps a need to grow food to survive and even more importantly that in a depression we could not afford the manufactured products to have success in growing vegetables. I am far from an alarmist but the ability to grow food, without any modern aids and using what is available within the environment, is something I believe is vital to our survival in the future. I learned about soil and how to improve it naturally, I read books on permaculture and natural organics plus sourced tips on how to do everything from making fertilisers to how to keep white butterflies from laying their eggs on your cabbages. I learned to use materials from the local environment to build retaining walls or simple stakes to hold up say tomato bushes, not using shop bought seeds etc etc…


Old house stumps used to make a retaining wall.


So over the years I have leaned much – and have practiced the things I have leaned in the many gardens, I created, in different parts of the world. Travel created good experience having had gardens in diverse places from the tropics of Australia to the colder northern reaches of Holland and places in between. So I thought why not make a series of blogs on different techniques to encourage you to grow  your own, save money and perhaps encourage some of you to share your tips and experiences. Here where I live there are no gardening books with growing information peculiar to this region so the thought has been with me to perhaps write a small vegetable gardening book for this area and what a better place to practice the art of producing such, and use you all as my guinea pigs.


close-ups


Broccoli

Broccoli is pretty easy to grow and its very good for you. (Do I sound like my mother or what!!) It is a good anti cancer food and is a good source of Vitamin A and calcium. Broccoli likes full sun, but keep watered. If you're a companion planter Broccoli likes to be near beets, carrots, cerlery, cucumbers, pototoes, onions, and spinach and it hates to be near beans, strawberries and tomatoes. If you plant sage and rosemary near by it helps to ward off some pests.


Here is a recipe for Broccoli which is yummy and I don't like to cook, so easy is good and this is easy.

Cut the broccoli in to small floretss and put in pot with salted (or no salt but I like salt)  water and blanch the broccoli. I'm not giving amounts because I never measure things, LOL. Save this water to cook some pasta in. In a frying pan add some olive oil and chuck in some garlic cloves and and saute the broccoli in this for a few mins. Put the cooked and drained pasta in with the broccoli. You can add more salt and some pepper if you want. Stir around and once it's done you can add a sprinkle of grated cheese on top.  An alternative to cheese, (poor mans cheese) is breadcrumbs sauted in a pan with Olive oil, garlic and salt until it becomes golden.

Sunday, August 24, 2008

Hello and Welcome to the Group. Topic for discussion: Monstera Deliciosa.

Keith thanks for making this group happen and I hope it is not an imposition to start off with a discussion here?

Last week I ventured to the side of the house where in previous years the well shaded area was home to the shade loving plants and more fussy of my over grown house plants. I go out there from time to time and because I had camera in hand I thought I would snap a few photos of my Monstera Deliciosa which is quite mature and also now a very large plant. It produces fruit and I managed to snap a few photos of the healthy looking crop of fruit, sometimes referred to as, fruit salad plant fruit. It has never been sprayed and it lives a very primitive life but thrives and it has made it through a few droughts lately which makes me think it gets water from very deep down. I have a little bit of information here about the plant, courtesy of Wikipedia :


Monstera deliciosa (also called Ceriman, Swiss Cheese Plant, Fruit Salad Plant, Monster fruit, Monsterio Delicio, Monstereo, Mexican Breadfruit, Monstera, split-leaf philodendron, Locust and Wild Honey, Windowleaf

Click here for more information.

MONSTERA, Monstera deliciosa 

Click here too.

Fruit Salad Plant
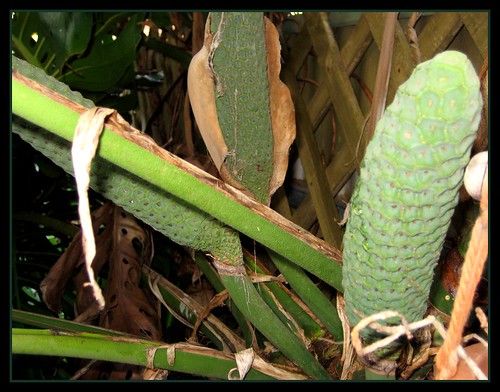
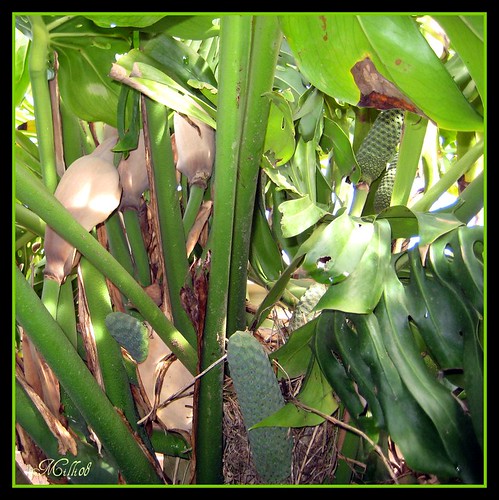
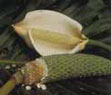
Often called the Fruit Salad plant or the Swiss Cheese Plant as the ripened fruit has a pineapple-banana odour and fruit salad taste. The mature fruit has a yellow-green, violet-spotted rind of hexagonal plates covering a creamy-white, soft pulp. Highly ornamental, an excellent choice for heavily shaded positions.

More info here too from this Australian site.

Now my question for this group is.

Has anyone ever eaten the fruit of this plant?

I have never tried it and just leave the fruit on the plant and forget about it. I have read that it can be a bit tricky as far as eating the fruit goes because it must be fully ripe and I read that the fruits can take a year to ripen fully. So if you have any information and wish to share please do so. Most people who grow these plants start out with them as pot plants because of their lovely shiny green heart shaped leaves and for one of these plants to even think of fruiting, it takes at least four years and conditions must be fully met for that to happen.

Regards from Milli.

Garden Gurus.


I have made the little fellow into something more suitable for an avatar. Tell me your thoughts are guys?

Wednesday, August 13, 2008

Wild Almond Trees in Blossom.

Img_1554-1.jpg picture by millimum


Img_1555-1.jpg picture by millimum


There is never such a finer scene
Than when the almond trees send forth their pretty blossoms.
Whilst other fruiting trees are still sleeping soundly.
 
In shades varying from softest pale pink, to full blush pink.
Also some varieties have papery pure white petals.
 
Grown in Almond Groves as we refer to them here
 The beauty of the blossoms on the tree is so pretty.

Whilst still looking magnificent as their petals
Fall to the ground or scatter on the wind
Leaving a beautiful cover across the Winter Earth.
 
Spring surely follows after the Almond blossoms have displayed their perfect colours.
 
Please enjoy My Almond Blossom Photos.
 
Milli